Quick Setup Guide
To make an EoIP tunnel between 2 routers which have IP addresses 10.5.8.1 and 10.1.0.1:
1.
On router with IP address 10.5.8.1, add an EoIP interface and set its MAC address:
/interface eoip add remote-address=10.1.0.1 tunnel-id=1 mac-address=00-00-5E-80-00-01 \
\... disabled=no
2.
On router with IP address 10.1.0.1, add an EoIP interface and set its MAC address::
/interface eoip add remote-address=10.5.8.1 tunnel-id=1 mac-address=00-00-5E-80-00-02 \
\... disabled=no
Now you can add IP addresses to the created EoIP interfaces from the same subnet.
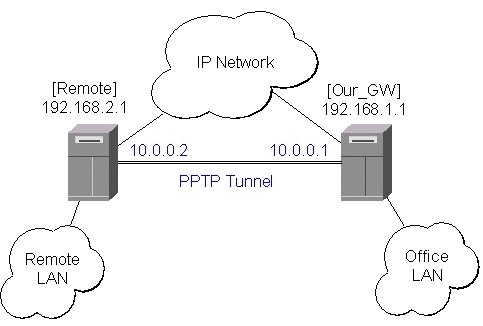
EoIP Application Example
To make a secure Ethernet bridge between two routers you should:
1.
Create a PPTP tunnel between them. Our_GW will be the pptp server:
[admin@Our_GW] interface pptp-server> /ppp secret add name=joe service=pptp \
\... password=top_s3 local-address=10.0.0.1 remote-address=10.0.0.2
[admin@Our_GW] interface pptp-server> add name=from_remote user=joe
[admin@Our_GW] interface pptp-server> server set enable=yes
[admin@Our_GW] interface pptp-server> print
Flags: X - disabled, D - dynamic, R - running
# NAME USER MTU CLIENT-AD... UPTIME ENCODING
0 from_remote joe
[admin@Our_GW] interface pptp-server>
The Remote router will be the pptp client:
[admin@Remote] interface pptp-client> add name=pptp user=joe \
\... connect-to=192.168.1.1 password=top_s3 mtu=1500 mru=1500
[admin@Remote] interface pptp-client> enable pptp
[admin@Remote] interface pptp-client> print
Flags: X - disabled, R - running
0 R name="pptp" mtu=1500 mru=1500 connect-to=192.168.1.1 user="joe"
password="top_s2" profile=default add-default-route=no
[admin@Remote] interface pptp-client> monitor pptp
status: "connected"
uptime: 39m46s
encoding: "none"
[admin@Remote] interface pptp-client>
See the PPTP Interface Manual for more details on setting up encrypted channels.
2.
Configure the EoIP tunnel by adding the eoip tunnel interfaces at both routers. Use the ip addresses of the pptp tunnel interfaces when specifying the argument values for the EoIP tunnel:
[admin@Our_GW] interface eoip> add name="eoip-remote" tunnel-id=0 \
\... remote-address=10.0.0.2
[admin@Our_GW] interface eoip> enable eoip-remote
[admin@Our_GW] interface eoip> print
Flags: X - disabled, R - running
0 name=eoip-remote mtu=1500 arp=enabled remote-address=10.0.0.2 tunnel-id=0
[admin@Our_GW] interface eoip>
[admin@Remote] interface eoip> add name="eoip" tunnel-id=0 \
\... remote-address=10.0.0.1
[admin@Remote] interface eoip> enable eoip-main
[admin@Remote] interface eoip> print
Flags: X - disabled, R - running
0 name=eoip mtu=1500 arp=enabled remote-address=10.0.0.1 tunnel-id=0
[Remote] interface eoip>
3.
Enable bridging between the EoIP and Ethernet interfaces on both routers.
On the Our_GW:
[admin@Our_GW] interface bridge> add
[admin@Our_GW] interface bridge> print
Flags: X - disabled, R - running
0 R name="bridge1" mtu=1500 arp=enabled mac-address=00:00:00:00:00:00
protocol-mode=none priority=0x8000 auto-mac=yes
admin-mac=00:00:00:00:00:00 max-message-age=20s forward-delay=15s
transmit-hold-count=6 ageing-time=5m
[admin@Our_GW] interface bridge> port add bridge=bridge1 interface=eoip-remote
[admin@Our_GW] interface bridge> port add bridge=bridge1 interface=office-eth
[admin@Our_GW] interface bridge> port print
Flags: X - disabled, I - inactive, D - dynamic
# INTERFACE BRIDGE PRIORITY PATH-COST
0 eoip-remote bridge1 128 10
1 office-eth bridge1 128 10
[admin@Our_GW] interface bridge>
And the same for the Remote:
[admin@Remote] interface bridge> add
[admin@Remote] interface bridge> print
Flags: X - disabled, R - running
0 R name="bridge1" mtu=1500 arp=enabled mac-address=00:00:00:00:00:00
protocol-mode=none priority=0x8000 auto-mac=yes
admin-mac=00:00:00:00:00:00 max-message-age=20s forward-delay=15s
transmit-hold-count=6 ageing-time=5m
[admin@Remote] interface bridge> port add bridge=bridge1 interface=ether
[admin@Remote] interface bridge> port add bridge=bridge1 interface=eoip-main
[admin@Remote] interface bridge> port print
Flags: X - disabled, I - inactive, D - dynamic
# INTERFACE BRIDGE PRIORITY PATH-COST
0 ether bridge1 128 10
1 eoip-main bridge1 128 10
[admin@Remote] interface bridge>
4. Addresses from the same network can be used both in the Office LAN and in the Remote LAN.
source: http://www.mikrotik.com/testdocs/ros/3.0/vpn/eoip.php
Sabtu, 08 Maret 2008
EoIP
Minggu, 02 Maret 2008
Routing Questions
Question: How does /ip route check-gateway work?
check-gateway sends pings every 10 seconds. if two successive pings fail, the gateway is considered dead.
Question: I have one /24 network advertised to two BGP peers using "/routing bgp networks" facility. How do I advertise a higher path cost to one of the peers?
You have to change the way you are redistributing your network, as filters are not applied to routes advertised from "/routing bgp networks". In most cases the network is connected directly to your router, so it's enough to set BGP instance to redistribute directly connected routes:
/routing bgp instance set default redistribute-connected=yes
To filter out all other connected networks except the needed one, create a routing filter for the BGP instance,
/routing filter add invert-match=yes prefix=10.0.0.0/24 action=discard name=InstanceOutFilter
then set filter "InstanceOutFilter" as the out-filter for "default" BGP instance.
/routing bgp instance set default out-filter=InstanceOutFilter
To communicate a lower preference value (higher path cost) to one of the peers, you have to prepend your AS number multiple times to the BGP AS_PATH attribute
/routing filter add prefix=10.0.0.0/24 set-bgp-prepend=4 name=Peer1OutFilter
/routing bgp peer set Peer1 out-filter=Peer1OutFilter
Question: I have a /22 (say 10.0.0.0/22) assigned IP space, split internally down into /30's, /28's, etc. Is it possible just to announce the /22 space via BGP with routing-test package?
Yes, it is possible. Do the following:
1. add an empty bridge interface:
/interface bridge add name=loopback
2. assign a /22 address to the bridge interface:
/ip address add address=10.0.0.1/22 interface=loopback
3. create a routing filter that filters out all prefixes except the /22 one
/routing filter add invert-match=yes prefix=10.0.0.0/22 prefix-length=22 action=discard name=myfilter
4. set filter "myfilter" as the out-filter for "default" BGP instance
/routing bgp instance set default out-filter=myfilter
Question: How to blackhole a network?
There are two ways to blackhole a network. First, you can do this manually by adding a blackhole route to the routing table, for example, to blackhole a 10.0.0.0/8 network, issue the following command:
/ip route add dst-address=10.0.0.0/8 kernel-type=blackhole
Routing filters are the other mean to blackhole a network. To create a routing filter that automatically blackholes all prefixes in 10.0.0.0/8 in the BGP feed, issue the following command:
/routing filter add prefix=10.0.0.0/8 prefix-length=8-32 set-kernel-type=blackhole chain=myfilter
Question: How to filter out the default route from outgoing BGP advertisements?
Assuming you have a static default route that is redistributed because redistribute-static parameter is set to yes, do the following:
/routing filter add chain=myfilter prefix=0.0.0.0/0 action=discard
Then set myfilter as the out-filter for BGP instance
/routing bgp instance set default out-filter=myfilter
Kamis, 28 Februari 2008
Rabu, 27 Februari 2008
Transparent Traffic Shaper
This example shows how to configure a transparent traffic shaper. The transparent traffic shaper is essentially a bridge that is able to differentiate and prioritize traffic that passes through it.
Consider the following network layout:
We will configure one queue limiting the total throughput to the client and three sub-queues that limit HTTP, P2P and all other traffic separately.
Quick Start for Impatient
Configuration snippet from the MikroTik router:
/ interface bridge
add name="bridge1"
/ interface bridge port
add interface=ether2 bridge=bridge1
add interface=ether3 bridge=bridge1

/ ip firewall mangle
add chain=prerouting protocol=tcp dst-port=80 action=mark-connection \
   new-connection-mark=http_conn passthrough=yes
add chain=prerouting connection-mark=http_conn action=mark-packet \
   new-packet-mark=http passthrough=no
add chain=prerouting p2p=all-p2p action=mark-connection \
   new-connection-mark=p2p_conn passthrough=yes
add chain=prerouting connection-mark=p2p_conn action=mark-packet \
   new-packet-mark=p2p passthrough=no
add chain=prerouting action=mark-connection new-connection-mark=other_conn \
   passthrough=yes
add chain=prerouting connection-mark=other_conn action=mark-packet \
   new-packet-mark=other passthrough=no

/ queue simple
add name="main" target-addresses=10.0.0.12/32 max-limit=256000/512000
add name="http" parent=main packet-marks=http max-limit=240000/500000
add name="p2p" parent=main packet-marks=p2p max-limit=64000/64000
add name="other" parent=main packet-marks=other max-limit=128000/128000
Explanation
Each piece of code is followed by the explanation of what it actually does.
Bridge
/ interface bridge
add name="bridge1"
/ interface bridge port
add interface=ether2 bridge=bridge1
add interface=ether3 bridge=bridge1
We create a new bridge interface and assign two ethernet interfaces to it. Thus the prospective traffic shaper will be completely transparent to the client.
Mangle
/ ip firewall mangle
add chain=prerouting protocol=tcp dst-port=80 action=mark-connection \
   new-connection-mark=http_conn passthrough=yes
add chain=prerouting connection-mark=http_conn action=mark-packet \
   new-packet-mark=http passthrough=no
All traffic destined to TCP port 80 is likely to be HTTP traffic and therefore is being marked with the packet mark http. Note, that the first rule has passthrough=yes while the second one has passthrough=no. (You can obtain additional information about mangle at http://www.mikrotik.com/docs/ros/2.9/ip/mangle)
/ ip firewall mangle
add chain=prerouting p2p=all-p2p action=mark-connection \
   new-connection-mark=p2p_conn passthrough=yes
add chain=prerouting connection-mark=p2p_conn action=mark-packet \
   new-packet-mark=p2p passthrough=no
add chain=prerouting action=mark-connection new-connection-mark=other_conn \
   passthrough=yes
add chain=prerouting connection-mark=other_conn action=mark-packet \
   new-packet-mark=other passthrough=no
Same as above, P2P traffic is marked with the packet mark p2p and all other traffic is marked with the packet mark other.
Queues
/ queue simple
add name="main" target-addresses=10.0.0.12/32 max-limit=256000/512000
We create a queue that limits all the traffic going to/from the client (specified by the target-address) to 256k/512k.
/ queue simple
add name="http" parent=main packet-marks=http max-limit=240000/500000
add name="p2p" parent=main packet-marks=p2p max-limit=64000/64000
add name="other" parent=main packet-marks=other max-limit=128000/128000
All sub-queues have the main queue as the parent, thus the aggregate data rate could not exceed limits specified in the main queue. Note, that http queue has higher priority than other queues, meaning that HTTP downloads are prioritized.
source http://wiki.mikrotik.com/wiki/TransparentTrafficShaperSelasa, 26 Februari 2008
PCQ Examples
Per Connection Queue (PCQ) is a queuing discipline that can be used to dynamically equalize or shape traffic for multiple users, using little administration. It is possible to divide PCQ scenarios into three major groups: equal bandwidth for a number of users, certain bandwidth equal distribution between users, unknown bandwidth equal distribution between users.
Equal Bandwidth for a Number of Users
Use PCQ type queue when you need to equalize the bandwidth [and set max limit] for a number of users. We will set the 64kbps download and 32kbps upload limits.

There are two ways how to make this: using mangle and queue trees, or, using simple queues.
1. Mark all packets with packet-mark all:
/ip firewall mangle add chain=prerouting action=mark-packet new-packet-mark=all passthrough=no
2. Setup two PCQ queue types - one for download and one for upload. dst-address is classifier for user's download traffic, src-address for upload traffic:
/queue type add name="PCQ_download" kind=pcq pcq-rate=64000 pcq-classifier=dst-address
/queue type add name="PCQ_upload" kind=pcq pcq-rate=32000 pcq-classifier=src-address
3. Finally, two queue rules are required, one for download and one for upload:
/queue tree add parent=global-in queue=PCQ_download packet-mark=all
/queue tree add parent=global-out queue=PCQ_upload packet-mark=all
If you don't like using mangle and queue trees, you can skip step 1, do step 2, and step 3 would be to create one simple queue as shown here:
/queue simple add queue=PCQ_upload/PCQ_download target-addresses=192.168.0.0/24
Certain Bandwidth Equal Distribution between Users
Unknown Bandwidth Equal Distribution between Users
source :http://wiki.mikrotik.com/wiki/PCQ_ExamplesMinggu, 24 Februari 2008
Ddos attack Protection
This firewall is powerfull to protect router and network from ddos attack
Use Dimitry Firewall
and add this rule to firewall
/ip firewall connection tracking set tcp-syncookie=yes
/ip firewall filter add chain=forward action=jump jump-target=block-ddos protocol=udp comment=Jump_to_block-ddos
/ip firewall filter add chain=input action=jump jump-target=block-ddos protocol=udp comment=Jump_to_block-ddos
/ip firewall filter add chain=block-ddos action=return limit=16,32
/ip firewall filter add chain=block-ddos action=log log-prefix=DDOS_ATTACK:
/ip firewall filter add chain=block-ddos action=drop limit=16,32
/ip firewall filter add chain=input action=jump jump-target=block-ddos protocol=udp comment=Jump_to_block-ddos
Senin, 18 Februari 2008
stop flooding of smtp / block spammers
/ ip firewall filter
add chain=forward action=add-src-to-address-list dst-port=25 protocol=tcp \
src-address-list=spammer address-list=WasASpammerOnce \
address-list-timeout=0s comment="Log Spammer to address list for future \
investigation" disabled=no
add chain=forward action=tarpit dst-port=25 protocol=tcp \
src-address-list=spammer comment="BLOCK SPAMMERS OR INFECTED USERS" \
disabled=no
add chain=forward action=add-src-to-address-list dst-port=25 protocol=tcp \
connection-limit=30,32 limit=50,5 src-address-list=!WhiteListed \
address-list=spammer address-list-timeout=30m comment="Detect and add-list \
SMTP virus or spammers" disabled=no
soure:http://forum.mikrotik.com/viewtopic.php?f=7&t=21836