Quick Start for Impatient
Configuration export from the gateway router:
'''/ ip address'''
add address=192.168.0.1/24 network=192.168.0.0 broadcast=192.168.0.255 interface=Local
add address=10.111.0.2/24 network=10.111.0.0 broadcast=10.111.0.255 interface=wlan2
add address=10.112.0.2/24 network=10.112.0.0 broadcast=10.112.0.255 interface=wlan1
'''/ ip firewall mangle'''
add chain=prerouting src-address-list=odd in-interface=Local action=mark-connection \
new-connection-mark=odd passthrough=yes
add chain=prerouting src-address-list=odd in-interface=Local action=mark-routing \
new-routing-mark=odd passthrough=no
add chain=prerouting src-address-list=even in-interface=Local action=mark-connection \
new-connection-mark=even passthrough=yes
add chain=prerouting src-address-list=even in-interface=Local action=mark-routing \
new-routing-mark=even passthrough=no
add chain=prerouting in-interface=Local connection-state=new nth=1,1,0 \
action=mark-connection new-connection-mark=odd passthrough=yes
add chain=prerouting in-interface=Local action=add-src-to-address-list \
address-list=odd address-list-timeout=1d connection-mark=odd passthrough=yes
add chain=prerouting in-interface=Local connection-mark=odd action=mark-routing \
new-routing-mark=odd passthrough=no
add chain=prerouting in-interface=Local connection-state=new nth=1,1,1 \
action=mark-connection new-connection-mark=even passthrough=yes
add chain=prerouting in-interface=Local action=add-src-to-address-list \
address-list=even address-list-timeout=1d connection-mark=even passthrough=yes
add chain=prerouting in-interface=Local connection-mark=even action=mark-routing \
new-routing-mark=even passthrough=no
'''/ ip firewall nat'''
add chain=srcnat connection-mark=odd action=src-nat to-addresses=10.111.0.2 \
to-ports=0-65535
add chain=srcnat connection-mark=even action=src-nat to-addresses=10.112.0.2 \
to-ports=0-65535
'''/ ip route'''
add dst-address=0.0.0.0/0 gateway=10.111.0.1 scope=255 target-scope=10 routing-mark=odd
add dst-address=0.0.0.0/0 gateway=10.112.0.1 scope=255 target-scope=10 routing-mark=even
add dst-address=0.0.0.0/0 gateway=10.112.0.1 scope=255 target-scope=10
[edit] Explanation
First we give a code snippet and then explain what it actually does.
[edit] IP Addresses
/ ip address
add address=192.168.0.1/24 network=192.168.0.0 broadcast=192.168.0.255 interface=Local
add address=10.111.0.2/24 network=10.111.0.0 broadcast=10.111.0.255 interface=wlan2
add address=10.112.0.2/24 network=10.112.0.0 broadcast=10.112.0.255 interface=wlan1
The router has two upstream (WAN) interfaces with the addresses of 10.111.0.2/24 and 10.112.0.2/24. The LAN interface has the name "Local" and IP address of 192.168.0.1/24.
[edit] Mangle
/ ip firewall mangle
add chain=prerouting src-address-list=odd in-interface=Local action=mark-connection \
new-connection-mark=odd passthrough=yes
add chain=prerouting src-address-list=odd in-interface=Local action=mark-routing \
new-routing-mark=odd
All traffic from customers having their IP address previously placed in the address list "odd" is instantly marked with connection and routing marks "odd". Afterwards the traffic is excluded from processing against successive mangle rules in prerouting chain.
/ ip firewall mangle
add chain=prerouting src-address-list=even in-interface=Local action=mark-connection \
new-connection-mark=even passthrough=yes
add chain=prerouting src-address-list=even in-interface=Local action=mark-routing \
new-routing-mark=even
Same stuff as above, only for customers having their IP address previously placed in the address list "even".
/ ip firewall mangle
add chain=prerouting in-interface=Local connection-state=new nth=1,1,0 \
action=mark-connection new-connection-mark=odd passthrough=yes
add chain=prerouting in-interface=Local action=add-src-to-address-list \
address-list=odd address-list-timeout=1d connection-mark=odd passthrough=yes
add chain=prerouting in-interface=Local connection-mark=odd action=mark-routing \
new-routing-mark=odd passthrough=no
First we take every second packet that establishes new session (note connection-state=new), and mark it with connection mark "odd". Consequently all successive packets belonging to the same session will carry the connection mark "odd". Note that we are passing these packets to the second and third rules (passthrough=yes). Second rule adds IP address of the client to the address list to enable all successive sessions to go through the same gateway. Third rule places the routing mark "odd" on all packets that belong to the "odd" connection and stops processing all other mangle rules for these packets in prerouting chain.
/ ip firewall mangle
add chain=prerouting in-interface=Local connection-state=new nth=1,1,1 \
action=mark-connection new-connection-mark=even passthrough=yes
add chain=prerouting in-interface=Local action=add-src-to-address-list \
address-list=even address-list-timeout=1d connection-mark=even passthrough=yes
add chain=prerouting in-interface=Local connection-mark=even action=mark-routing \
new-routing-mark=even passthrough=no
These rules do the same for the remaining half of the traffic as the first three rules for the first half of the traffic.
The code above effectively means that each new connection initiated through the router from the local network will be marked as either "odd" or "even" with both routing and connection marks.
The above works fine. There are however some situations where you might find that the same IP address is listed under both the ODD and EVEN scr-address-lists. This behavior causes issues with apps that require persistent connections. A simple remedy for this situation is to add the following statement to your mangle rules:
add chain=prerouting in-interface=Local connection-state=new nth=1,1,1 \
src-address-list=!odd action=mark-connection new-connection-mark=even \
passthrough=yes
This will ensure that the new connection will not already be part of the ODD src-address-list. You will have to do the same for the ODD mangle rule thus excluding IP's already part of the EVEN scr-address-list.
[edit] NAT
/ ip firewall nat
add chain=srcnat connection-mark=odd action=src-nat to-addresses=10.111.0.2 \
to-ports=0-65535
add chain=srcnat connection-mark=even action=src-nat to-addresses=10.112.0.2 \
to-ports=0-65535
All traffic marked "odd" is being NATted to source IP address of 10.111.0.2, while traffic marked "even" gets "10.112.0.2" source IP address.
[edit] Routing
/ ip route
add dst-address=0.0.0.0/0 gateway=10.111.0.1 scope=255 target-scope=10 routing-mark=odd
add dst-address=0.0.0.0/0 gateway=10.112.0.1 scope=255 target-scope=10 routing-mark=even
For all traffic marked "odd" (consequently having 10.111.0.2 translated source address) we use 10.111.0.1 gateway. In the same manner all traffic marked "even" is routed through the 10.112.0.1 gateway.
/ ip route
add dst-address=0.0.0.0/0 gateway=10.112.0.1 scope=255 target-scope=10
Finally, we have one additional entry specifying that traffic from the router itself (the traffic without any routing marks) should go to 10.112.0.1 gateway.
source:http://wiki.mikrotik.com/wiki/Load_Balancing_Persistent
Kamis, 24 April 2008
Load Balancing Persistent
Two gateways failover with load balancing
Route
According to the examples above, you have:
/ ip route
add dst-address=0.0.0.0/0 gateway=10.111.0.1 scope=255 target-scope=10 routing-mark=odd
add dst-address=0.0.0.0/0 gateway=10.112.0.1 scope=255 target-scope=10 routing-mark=even
add dst-address=0.0.0.0/0 gateway=10.112.0.1 scope=255 target-scope=10
Now you have to change these lines to:
/ ip route
add dst-address=0.0.0.0/0 gateway=10.111.0.1 scope=255 target-scope=10 routing-mark=odd check-gateway=ping
add dst-address=0.0.0.0/0 gateway=10.112.0.1 scope=255 target-scope=10 routing-mark=even check-gateway=ping
add dst-address=0.0.0.0/0 gateway=10.112.0.1 scope=255 target-scope=10
add dst-address=0.0.0.0/0 gateway=10.111.0.1 scope=255 target-scope=10 distance=2
If ping fails to 10.111.0.1, then all traffic marked odd go's to the gateway 10.112.0.1, the oposite is also true.
All local traffic go's to the 10.112.0.1 as it's distance is smaller, if 10.112.0.1 fails, then 10.111.0.1 takes over.
The router pings gateway every 10 seconds and if to consecutive pings to the gateway fail, the route is considered dead. So, then testing keep in mind, that gateway failure is detected in 20 to 30 seconds.
[edit] NAT
/ ip firewall nat
add chain=srcnat connection-mark=odd action=src-nat to-addresses=10.111.0.2 \
to-ports=0-65535 comment="" disabled=no
add chain=srcnat connection-mark=even action=src-nat to-addresses=10.112.0.2 \
to-ports=0-65535 comment="" disabled=no
change to:
/ip firewall nat
add chain=srcnat src-address=192.168.0.0/24 action=masquerade
source:http://wiki.mikrotik.com/wiki/Two_gateways_failover_with_load_balancing
Jumat, 11 April 2008
Memisahkan gateway traffic Local dan International
/ ip address
add address=203.89.24.66/27 network=203.89.24.64 broadcast=203.89.24.95 \
interface=ether1 comment=”ip point to point utk traffic lnternational” \
disabled=no
add address=203.89.24.178/30 network=203.89.24.176 broadcast=203.89.24.179 \
interface=ether1 comment=”ip point to point utk traffic local” disabled=no
/ ip firewall address-list
add list=nice address=58.65.240.0/23 comment=”” disabled=no
add list=nice address=58.65.242.0/23 comment=”” disabled=no
add list=nice address=58.65.244.0/23 comment=”” disabled=no
add list=nice address=58.65.246.0/23 comment=”” disabled=no
add list=nice address=58.145.174.0/24 comment=”” disabled=no
add list=nice address=58.147.184.0/24 comment=”” disabled=no
add list=nice address=58.147.185.0/24 comment=”” disabled=no
dst…
/ ip firewall mangle
add chain=postrouting dst-address-list=nice action=mark-routing \
new-routing-mark=nice passthrough=yes comment=”” disabled=no
/ ip route
add dst-address=0.0.0.0/0 gateway=203.89.24.65 scope=255 target-scope=10 \
comment=”traffic selain local Indonesia” disabled=no
add dst-address=0.0.0.0/0 gateway=203.89.24.177 scope=255 target-scope=10 \
routing-mark=nice comment=”traffic local Indonesia” disabled=no
Sabtu, 08 Maret 2008
EoIP
Quick Setup Guide
To make an EoIP tunnel between 2 routers which have IP addresses 10.5.8.1 and 10.1.0.1:
1.
On router with IP address 10.5.8.1, add an EoIP interface and set its MAC address:
/interface eoip add remote-address=10.1.0.1 tunnel-id=1 mac-address=00-00-5E-80-00-01 \
\... disabled=no
2.
On router with IP address 10.1.0.1, add an EoIP interface and set its MAC address::
/interface eoip add remote-address=10.5.8.1 tunnel-id=1 mac-address=00-00-5E-80-00-02 \
\... disabled=no
Now you can add IP addresses to the created EoIP interfaces from the same subnet.
EoIP Application Example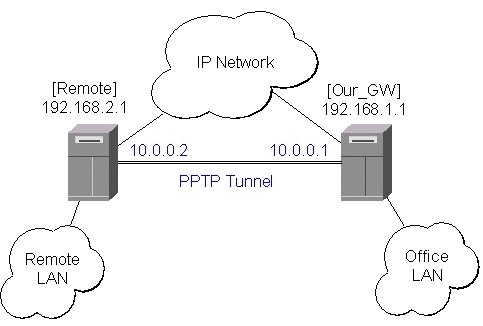
To make a secure Ethernet bridge between two routers you should:
1.
Create a PPTP tunnel between them. Our_GW will be the pptp server:
[admin@Our_GW] interface pptp-server> /ppp secret add name=joe service=pptp \
\... password=top_s3 local-address=10.0.0.1 remote-address=10.0.0.2
[admin@Our_GW] interface pptp-server> add name=from_remote user=joe
[admin@Our_GW] interface pptp-server> server set enable=yes
[admin@Our_GW] interface pptp-server> print
Flags: X - disabled, D - dynamic, R - running
# NAME USER MTU CLIENT-AD... UPTIME ENCODING
0 from_remote joe
[admin@Our_GW] interface pptp-server>
The Remote router will be the pptp client:
[admin@Remote] interface pptp-client> add name=pptp user=joe \
\... connect-to=192.168.1.1 password=top_s3 mtu=1500 mru=1500
[admin@Remote] interface pptp-client> enable pptp
[admin@Remote] interface pptp-client> print
Flags: X - disabled, R - running
0 R name="pptp" mtu=1500 mru=1500 connect-to=192.168.1.1 user="joe"
password="top_s2" profile=default add-default-route=no
[admin@Remote] interface pptp-client> monitor pptp
status: "connected"
uptime: 39m46s
encoding: "none"
[admin@Remote] interface pptp-client>
See the PPTP Interface Manual for more details on setting up encrypted channels.
2.
Configure the EoIP tunnel by adding the eoip tunnel interfaces at both routers. Use the ip addresses of the pptp tunnel interfaces when specifying the argument values for the EoIP tunnel:
[admin@Our_GW] interface eoip> add name="eoip-remote" tunnel-id=0 \
\... remote-address=10.0.0.2
[admin@Our_GW] interface eoip> enable eoip-remote
[admin@Our_GW] interface eoip> print
Flags: X - disabled, R - running
0 name=eoip-remote mtu=1500 arp=enabled remote-address=10.0.0.2 tunnel-id=0
[admin@Our_GW] interface eoip>
[admin@Remote] interface eoip> add name="eoip" tunnel-id=0 \
\... remote-address=10.0.0.1
[admin@Remote] interface eoip> enable eoip-main
[admin@Remote] interface eoip> print
Flags: X - disabled, R - running
0 name=eoip mtu=1500 arp=enabled remote-address=10.0.0.1 tunnel-id=0
[Remote] interface eoip>
3.
Enable bridging between the EoIP and Ethernet interfaces on both routers.
On the Our_GW:
[admin@Our_GW] interface bridge> add
[admin@Our_GW] interface bridge> print
Flags: X - disabled, R - running
0 R name="bridge1" mtu=1500 arp=enabled mac-address=00:00:00:00:00:00
protocol-mode=none priority=0x8000 auto-mac=yes
admin-mac=00:00:00:00:00:00 max-message-age=20s forward-delay=15s
transmit-hold-count=6 ageing-time=5m
[admin@Our_GW] interface bridge> port add bridge=bridge1 interface=eoip-remote
[admin@Our_GW] interface bridge> port add bridge=bridge1 interface=office-eth
[admin@Our_GW] interface bridge> port print
Flags: X - disabled, I - inactive, D - dynamic
# INTERFACE BRIDGE PRIORITY PATH-COST
0 eoip-remote bridge1 128 10
1 office-eth bridge1 128 10
[admin@Our_GW] interface bridge>
And the same for the Remote:
[admin@Remote] interface bridge> add
[admin@Remote] interface bridge> print
Flags: X - disabled, R - running
0 R name="bridge1" mtu=1500 arp=enabled mac-address=00:00:00:00:00:00
protocol-mode=none priority=0x8000 auto-mac=yes
admin-mac=00:00:00:00:00:00 max-message-age=20s forward-delay=15s
transmit-hold-count=6 ageing-time=5m
[admin@Remote] interface bridge> port add bridge=bridge1 interface=ether
[admin@Remote] interface bridge> port add bridge=bridge1 interface=eoip-main
[admin@Remote] interface bridge> port print
Flags: X - disabled, I - inactive, D - dynamic
# INTERFACE BRIDGE PRIORITY PATH-COST
0 ether bridge1 128 10
1 eoip-main bridge1 128 10
[admin@Remote] interface bridge>
4. Addresses from the same network can be used both in the Office LAN and in the Remote LAN.
source: http://www.mikrotik.com/testdocs/ros/3.0/vpn/eoip.php
Minggu, 02 Maret 2008
Routing Questions
Question: How does /ip route check-gateway work?
check-gateway sends pings every 10 seconds. if two successive pings fail, the gateway is considered dead.
Question: I have one /24 network advertised to two BGP peers using "/routing bgp networks" facility. How do I advertise a higher path cost to one of the peers?
You have to change the way you are redistributing your network, as filters are not applied to routes advertised from "/routing bgp networks". In most cases the network is connected directly to your router, so it's enough to set BGP instance to redistribute directly connected routes:
/routing bgp instance set default redistribute-connected=yes
To filter out all other connected networks except the needed one, create a routing filter for the BGP instance,
/routing filter add invert-match=yes prefix=10.0.0.0/24 action=discard name=InstanceOutFilter
then set filter "InstanceOutFilter" as the out-filter for "default" BGP instance.
/routing bgp instance set default out-filter=InstanceOutFilter
To communicate a lower preference value (higher path cost) to one of the peers, you have to prepend your AS number multiple times to the BGP AS_PATH attribute
/routing filter add prefix=10.0.0.0/24 set-bgp-prepend=4 name=Peer1OutFilter
/routing bgp peer set Peer1 out-filter=Peer1OutFilter
Question: I have a /22 (say 10.0.0.0/22) assigned IP space, split internally down into /30's, /28's, etc. Is it possible just to announce the /22 space via BGP with routing-test package?
Yes, it is possible. Do the following:
1. add an empty bridge interface:
/interface bridge add name=loopback
2. assign a /22 address to the bridge interface:
/ip address add address=10.0.0.1/22 interface=loopback
3. create a routing filter that filters out all prefixes except the /22 one
/routing filter add invert-match=yes prefix=10.0.0.0/22 prefix-length=22 action=discard name=myfilter
4. set filter "myfilter" as the out-filter for "default" BGP instance
/routing bgp instance set default out-filter=myfilter
Question: How to blackhole a network?
There are two ways to blackhole a network. First, you can do this manually by adding a blackhole route to the routing table, for example, to blackhole a 10.0.0.0/8 network, issue the following command:
/ip route add dst-address=10.0.0.0/8 kernel-type=blackhole
Routing filters are the other mean to blackhole a network. To create a routing filter that automatically blackholes all prefixes in 10.0.0.0/8 in the BGP feed, issue the following command:
/routing filter add prefix=10.0.0.0/8 prefix-length=8-32 set-kernel-type=blackhole chain=myfilter
Question: How to filter out the default route from outgoing BGP advertisements?
Assuming you have a static default route that is redistributed because redistribute-static parameter is set to yes, do the following:
/routing filter add chain=myfilter prefix=0.0.0.0/0 action=discard
Then set myfilter as the out-filter for BGP instance
/routing bgp instance set default out-filter=myfilter
Kamis, 28 Februari 2008
Rabu, 27 Februari 2008
Transparent Traffic Shaper
This example shows how to configure a transparent traffic shaper. The transparent traffic shaper is essentially a bridge that is able to differentiate and prioritize traffic that passes through it.
Consider the following network layout:
We will configure one queue limiting the total throughput to the client and three sub-queues that limit HTTP, P2P and all other traffic separately.
Quick Start for Impatient
Configuration snippet from the MikroTik router:
/ interface bridge
add name="bridge1"
/ interface bridge port
add interface=ether2 bridge=bridge1
add interface=ether3 bridge=bridge1

/ ip firewall mangle
add chain=prerouting protocol=tcp dst-port=80 action=mark-connection \
   new-connection-mark=http_conn passthrough=yes
add chain=prerouting connection-mark=http_conn action=mark-packet \
   new-packet-mark=http passthrough=no
add chain=prerouting p2p=all-p2p action=mark-connection \
   new-connection-mark=p2p_conn passthrough=yes
add chain=prerouting connection-mark=p2p_conn action=mark-packet \
   new-packet-mark=p2p passthrough=no
add chain=prerouting action=mark-connection new-connection-mark=other_conn \
   passthrough=yes
add chain=prerouting connection-mark=other_conn action=mark-packet \
   new-packet-mark=other passthrough=no

/ queue simple
add name="main" target-addresses=10.0.0.12/32 max-limit=256000/512000
add name="http" parent=main packet-marks=http max-limit=240000/500000
add name="p2p" parent=main packet-marks=p2p max-limit=64000/64000
add name="other" parent=main packet-marks=other max-limit=128000/128000
Explanation
Each piece of code is followed by the explanation of what it actually does.
Bridge
/ interface bridge
add name="bridge1"
/ interface bridge port
add interface=ether2 bridge=bridge1
add interface=ether3 bridge=bridge1
We create a new bridge interface and assign two ethernet interfaces to it. Thus the prospective traffic shaper will be completely transparent to the client.
Mangle
/ ip firewall mangle
add chain=prerouting protocol=tcp dst-port=80 action=mark-connection \
   new-connection-mark=http_conn passthrough=yes
add chain=prerouting connection-mark=http_conn action=mark-packet \
   new-packet-mark=http passthrough=no
All traffic destined to TCP port 80 is likely to be HTTP traffic and therefore is being marked with the packet mark http. Note, that the first rule has passthrough=yes while the second one has passthrough=no. (You can obtain additional information about mangle at http://www.mikrotik.com/docs/ros/2.9/ip/mangle)
/ ip firewall mangle
add chain=prerouting p2p=all-p2p action=mark-connection \
   new-connection-mark=p2p_conn passthrough=yes
add chain=prerouting connection-mark=p2p_conn action=mark-packet \
   new-packet-mark=p2p passthrough=no
add chain=prerouting action=mark-connection new-connection-mark=other_conn \
   passthrough=yes
add chain=prerouting connection-mark=other_conn action=mark-packet \
   new-packet-mark=other passthrough=no
Same as above, P2P traffic is marked with the packet mark p2p and all other traffic is marked with the packet mark other.
Queues
/ queue simple
add name="main" target-addresses=10.0.0.12/32 max-limit=256000/512000
We create a queue that limits all the traffic going to/from the client (specified by the target-address) to 256k/512k.
/ queue simple
add name="http" parent=main packet-marks=http max-limit=240000/500000
add name="p2p" parent=main packet-marks=p2p max-limit=64000/64000
add name="other" parent=main packet-marks=other max-limit=128000/128000
All sub-queues have the main queue as the parent, thus the aggregate data rate could not exceed limits specified in the main queue. Note, that http queue has higher priority than other queues, meaning that HTTP downloads are prioritized.
source http://wiki.mikrotik.com/wiki/TransparentTrafficShaperSelasa, 26 Februari 2008
PCQ Examples
Per Connection Queue (PCQ) is a queuing discipline that can be used to dynamically equalize or shape traffic for multiple users, using little administration. It is possible to divide PCQ scenarios into three major groups: equal bandwidth for a number of users, certain bandwidth equal distribution between users, unknown bandwidth equal distribution between users.
Equal Bandwidth for a Number of Users
Use PCQ type queue when you need to equalize the bandwidth [and set max limit] for a number of users. We will set the 64kbps download and 32kbps upload limits.

There are two ways how to make this: using mangle and queue trees, or, using simple queues.
1. Mark all packets with packet-mark all:
/ip firewall mangle add chain=prerouting action=mark-packet new-packet-mark=all passthrough=no
2. Setup two PCQ queue types - one for download and one for upload. dst-address is classifier for user's download traffic, src-address for upload traffic:
/queue type add name="PCQ_download" kind=pcq pcq-rate=64000 pcq-classifier=dst-address
/queue type add name="PCQ_upload" kind=pcq pcq-rate=32000 pcq-classifier=src-address
3. Finally, two queue rules are required, one for download and one for upload:
/queue tree add parent=global-in queue=PCQ_download packet-mark=all
/queue tree add parent=global-out queue=PCQ_upload packet-mark=all
If you don't like using mangle and queue trees, you can skip step 1, do step 2, and step 3 would be to create one simple queue as shown here:
/queue simple add queue=PCQ_upload/PCQ_download target-addresses=192.168.0.0/24
Certain Bandwidth Equal Distribution between Users
Unknown Bandwidth Equal Distribution between Users
source :http://wiki.mikrotik.com/wiki/PCQ_ExamplesMinggu, 24 Februari 2008
Ddos attack Protection
This firewall is powerfull to protect router and network from ddos attack
Use Dimitry Firewall
and add this rule to firewall
/ip firewall connection tracking set tcp-syncookie=yes
/ip firewall filter add chain=forward action=jump jump-target=block-ddos protocol=udp comment=Jump_to_block-ddos
/ip firewall filter add chain=input action=jump jump-target=block-ddos protocol=udp comment=Jump_to_block-ddos
/ip firewall filter add chain=block-ddos action=return limit=16,32
/ip firewall filter add chain=block-ddos action=log log-prefix=DDOS_ATTACK:
/ip firewall filter add chain=block-ddos action=drop limit=16,32
/ip firewall filter add chain=input action=jump jump-target=block-ddos protocol=udp comment=Jump_to_block-ddos
Senin, 18 Februari 2008
stop flooding of smtp / block spammers
/ ip firewall filter
add chain=forward action=add-src-to-address-list dst-port=25 protocol=tcp \
src-address-list=spammer address-list=WasASpammerOnce \
address-list-timeout=0s comment="Log Spammer to address list for future \
investigation" disabled=no
add chain=forward action=tarpit dst-port=25 protocol=tcp \
src-address-list=spammer comment="BLOCK SPAMMERS OR INFECTED USERS" \
disabled=no
add chain=forward action=add-src-to-address-list dst-port=25 protocol=tcp \
connection-limit=30,32 limit=50,5 src-address-list=!WhiteListed \
address-list=spammer address-list-timeout=30m comment="Detect and add-list \
SMTP virus or spammers" disabled=no
soure:http://forum.mikrotik.com/viewtopic.php?f=7&t=21836
Jumat, 15 Februari 2008
Siren II
/ tool netwatch
add host=213.xxx.xxx.x timeout=1s interval=1m up-script="" down-script=":log info \"GATEWAY \
\n :set i 15 \=50 step=1 \\
\n :beep length=400ms frequency=\$x; \
\n \ :set x (\$x +35)
\n :beep length=0 \) && (\$i >0))
\n}" comment="" disabled=no
[admin@RouTer] tool netwatch>
and script is
:log info "GATEWAY Problem No INTERNET"
:for c from=1 to=50 step=1 \
do={ \
:set i 15
:set x 1900
:do {\
:beep length=400ms frequency=$x; :delay 25ms
:set i ($i - 1);
:set x ($x +35)
} \
while (($i <16)>0))
:beep length=0 frequency=0
}
create a script named "siren" using danz9370 source code, then
create another script named "end-siren" with this source code:
/sys script job remove [find \
script="siren"]
now do netwatch and specify "end-siren" under "on up" and "siren" under "on down"
insert this script with for stop until internet up
:for i from=1000 to=2800 step=80 do={:beep length=10ms frequency=$i; :delay 10ms;}
:for i from=2800 to=1000 step=-80 do={:beep length=10ms frequency=$i; :delay 10ms;}
source :http://forum.mikrotik.com/viewtopic.php?f=9&t=12072&hilit=siren
Selasa, 12 Februari 2008
Load Balancing over Multiple Gateways
The typical situation where you got one router and want to connect to two ISPs:

Of course, you want to do load balancing! There are several ways how to do it. Depending on the particular situation, you may find one best suited for you.
Policy Routing based on Client IP Address
If you have a number of hosts, you may group them by IP addresses. Then, depending on the source IP address, send the traffic out through Gateway #1 or #2. This is not really the best approach, giving you perfect load balancing, but it's easy to implement, and gives you some control too.
Let us assume we use for our workstations IP addresses from network 192.168.100.0/24. The IP addresses are assigned as follows:
- 192.168.100.1-127 are used for Group A workstations
- 192.168.100.128-253 are used for Group B workstations
- 192.168.100.254 is used for the router.
All workstations have IP configuration with the IP address from the relevant group, they all have network mask 255.255.255.0, and 192.168.100.254 is the default gateway for them. We will talk about DNS servers later.
Now, when we have workstations divided into groups, we can refer to them using subnet addressing:
- Group A is 192.168.100.0/25, i.e., addresses 192.168.100.0-127
- Group B is 192.168.100.128/25, i.e., addresses 192.168.100.128-255
If you do not understand this, take the TCP/IP Basics course,
or, look for some resources about subnetting on the Internet!
We need to add two IP Firewall Mangle rules to mark the packets originated from Group A or Group B workstations.
For Group A, specify
- Chain prerouting and Src. Address 192.168.100.0/25
- Action mark routing and New Routing Mark GroupA.

It is a good practice to add a comment as well. Your mangle rules might be interesting for someone else and for yourself as well after some time.
For Group B, specify
- Chain prerouting and Src. Address 192.168.100.128/25
- Action mark routing and New Routing Mark GroupB

All IP traffic coming from workstations is marked with the routing marks GroupA or GroupB. We can use these marks in the routing table.
Next, we should specify two default routes (destination 0.0.0.0/0) with appropriate routing marks and gateways:

This thing is not going to work, unless you do masquerading for your LAN! The simplest way to do it is by adding one NAT rule for Src. Address 192.168.100.0/24 and Action masquerade:

Test the setup by tracing the route to some IP address on the Internet!
From a workstation of Group A, it should go like this:
C:\>tracert -d 8.8.8.8

Tracing route to 8.8.8.8 over a maximum of 30 hops

1     2 ms     2 ms     2 ms  192.168.100.254
2    10 ms     4 ms     3 ms  10.1.0.1
...
From a workstation of Group B, it should go like this:
C:\>tracert -d 8.8.8.8

Tracing route to 8.8.8.8 over a maximum of 30 hops

1     2 ms     2 ms     2 ms  192.168.100.254
2    10 ms     4 ms     3 ms  10.5.8.1
...
You can specify the DNS server for workstations quite freely, just make it can be reached (test it by tracing the route to DNS server's IP address)!
Source : http://wiki.mikrotik.com/wiki/Load_Balancing_over_Multiple_Gateways
Senin, 11 Februari 2008
Improved Netwatch II
This setup now changes the distance number on the interfaces that is being used for gateways instead of disabling an interface. That way you could continue to monitor the unused interface to know whether it is actually up or down to the internet.
With these scripts you must use the scheduler to run them. I set mine to every 5 seconds. This will send 5 pings in a row out ether 1 and if all 5 fail it will increase the distance on that port to 3 instead of 1. To start this process you must set your distance on port 1 to 1. The other port that is being used as a failover gateway should be set to a distance of 2. By switching distance on the port instead of disabling it allows you to continue to ping out ether 1 until it pings all 5 times and at that point it will switch back to the main gateway.
script 1:
       :local i 0; {:do {:set i ($i + 1)} while i < 5) && ([/ping 64.233.169.99 interval=3 count=1]=0)};
      :if ($i=5 && [/ip route get [find comment="Default Route"] distance]=1) do={:log info "Main Gateway down";
       /ip route set [find comment="Default Route"] distance=3}
script 2:
      :local i 0; {:do {:set i ($i + 1)} while i < 5) && ([/ping 64.233.169.99 interval=3 count=1]=1)};
     :if ($i=5 && [/ip route get [find comment="Default Route"] distance]=3) do={:log info "Main Gateway up";
     /ip route set [find comment="Default Route"] distance=1}
Suggestion: A trick could be use ping with different sizes and have a different route for each. That would require creating a mangle rule based on packet size and place a routing mark on each.
Source : http://wiki.mikrotik.com/wiki/Improved_Netwatch_II
Improved Netwatch
This is an improved version of Netwatch that removes false positives. It works by pinging the target IP 5 times. If all 5 time out then the specified action is taken.
        :local i 0; {:do {:set i ($i + 1)} while i < 5) && ([/ping 72.14.207.104 interval=3 count=1]=0)};
       :if ($i=5 && [/ip route get [find comment="Default Route"] disabled]=false) do={:log info "Main Gateway down";
        /ip route set [find comment="Default Route"] disabled=yes}
In this case it searches for a route labelled "Default Route" and disables it if 5 pings in a row to www.google.com time out. To re-enable on 5 succesfull pings you could have some thing like:
       :local i 0; {:do {:set i ($i + 1)} while i < 5) && ([/ping 72.14.207.104 interval=3 count=1]=1)};
      :if ($i=5 && [/ip route get [find comment="Default Route"] disabled]=true) do={:log info "Main Gateway up";
      /ip route set [find comment="Default Route"] disabled=no}


Source: http://wiki.mikrotik.com/wiki/Improved_Netwatch
SETTING OSPF MAIN ROUTER
Setting Interface
[admin@MainRouter] > in pr
Flags: X - disabled, D - dynamic, R - running
# NAME TYPE RX-RATE TX-RATE MTU
0 R ether1=ToClient ether 0 0 1500
1 R ether2=ToInternet ether 0 0 1500
Setting IP
[admin@MainRouter] > ip add pr
Flags: X - disabled, I - invalid, D - dynamic
# ADDRESS NETWORK BROADCAST INTERFACE
0 192.168.10.18/27 192.168.10.0 192.168.10.31 ether2=ToInternet
1 10.10.10.1/24 10.10.10.0 10.10.10.255 ether1=ToClient
2 10.10.20.1/24 10.10.20.0 10.10.20.255 ether1=ToClient
Setting Gateway (ROUTE)
[admin@MainRouter] > ip rou pr
Flags: X - disabled, A - active, D - dynamic,
C - connect, S - static, r - rip, b - bgp, o - ospf
# DST-ADDRESS PREF-SRC G GATEWAY DIS
0 ADC 192.168.10.0/27 192.168.10.18
1 A S 0.0.0.0/0 r 192.168.10.1
Setting NAT
[admin@MainRouter] > ip fire nat pr
Flags: X - disabled, I - invalid, D - dynamic
0 chain=srcnat out-interface=ether2=ToInternet action=masquerade
Setting DNS
[admin@MainRouter] > ip dns pr
primary-dns: 222.124.180.40
secondary-dns: 0.0.0.0
allow-remote-requests: yes
cache-size: 2048KiB
cache-max-ttl: 1w
cache-used: 20KiB
SETTING OSPF
[admin@MainRouter] > routing ospf pr
router-id: 0.0.0.0
distribute-default: if-installed-as-type-2
redistribute-connected: as-type-1
redistribute-static: as-type-2
redistribute-rip: no
redistribute-bgp: no
metric-default: 1
metric-connected: 0
metric-static: 0
metric-rip: 0
metric-bgp: 0
Setting OSPF AREA
[admin@MainRouter] > routing ospf area print
Flags: X - disabled
# NAME AREA-ID TYPE DEFAULT-COST AUTHENTICATION
0 backbone 0.0.0.0 default none
1 Local 0.0.0.1 default 1 none
Setting OSPF NETWORK
[admin@MainRouter] > routing ospf network print
Flags: X - disabled, I - invalid
# NETWORK AREA
0 10.10.10.0/24 Local
1 10.10.20.0/24 Local
Hasil Settingan di OSPF Neighbors
[admin@MainRouter] > routing ospf neighbor print
router-id=192.168.101.1 address=10.10.20.2 priority=1 state=”Full”
state-changes=4 ls-retransmits=0 ls-requests=0 db-summaries=0
dr-id=10.10.20.1 backup-dr-id=10.10.20.2
router-id=192.168.200.1 address=10.10.10.2 priority=1 state=”Full”
state-changes=8 ls-retransmits=0 ls-requests=0 db-summaries=0
dr-id=10.10.10.1 backup-dr-id=10.10.10.2
router-id=192.168.10.18 address=10.10.20.1 priority=1 state=”2-Way”
state-changes=0 ls-retransmits=0 ls-requests=0 db-summaries=0
dr-id=10.10.20.1 backup-dr-id=10.10.20.2
[admin@MainRouter] > ip rou pr
Flags: X - disabled, A - active, D - dynamic,
C - connect, S - static, r - rip, b - bgp, o - ospf
# DST-ADDRESS PREF-SRC G GATEWAY DIS
0 ADC 10.10.10.0/24 10.10.10.1
1 Do 10.10.10.0/24
2 ADC 10.10.20.0/24 10.10.20.1
3 Do 10.10.20.0/24
4 ADC 192.168.10.0/27 192.168.10.18
5 ADo 192.168.100.0/30 r 10.10.10.2
6 ADo 192.168.101.0/24 r 10.10.20.2
7 ADo 192.168.200.0/30 r 10.10.10.2
8 A S 0.0.0.0/0 r 192.168.10.1
SETTING OSPF CLIENT1
[admin@Client1=RouterBoard] > in pr
Flags: X - disabled, D - dynamic, R - running
# NAME TYPE RX-RATE TX-RATE MTU
0 R ether1=ToMainRouter ether 0 0 1500
1 R ether2=ToLocal ether 0 0 1500
2 R ether3 ether 0 0 1500
3 wlan1 wlan 0 0 1500
4 X wlan2 wlan 0 0 1500
[admin@Client1=RouterBoard] > ip add pr
Flags: X - disabled, I - invalid, D - dynamic
# ADDRESS NETWORK BROADCAST INTERFACE
0 10.10.10.2/24 10.10.10.0 10.10.10.255 ether1=ToMainRouter
1 192.168.100.1/30 192.168.100.0 192.168.100.3 ether2=ToLocal
2 192.168.200.1/30 192.168.200.0 192.168.200.3 wlan1
[admin@Client1=RouterBoard] > ip dns pr
primary-dns: 0.0.0.0
secondary-dns: 0.0.0.0
allow-remote-requests: no
cache-size: 2048KiB
cache-max-ttl: 1w
cache-used: 17KiB
[admin@Client1=RouterBoard] > rou ospf pr
router-id: 0.0.0.0
distribute-default: never
redistribute-connected: as-type-1
redistribute-static: no
redistribute-rip: no
redistribute-bgp: no
metric-default: 1
metric-connected: 0
metric-static: 0
metric-rip: 0
metric-bgp: 0
[admin@Client1=RouterBoard] > rou ospf area pr
Flags: X - disabled
# NAME AREA-ID TYPE DEFAULT-COST AUTHENTICATION
0 backbone 0.0.0.0 default none
1 Local 0.0.0.1 default 1 none
[admin@Client1=RouterBoard] > rou ospf network pr
Flags: X - disabled, I - invalid
# NETWORK AREA
0 10.10.10.0/24 Local
1 10.10.20.0/24 Local
[admin@Client1=RouterBoard] > ip route pr
Flags: X - disabled, A - active, D - dynamic,
C - connect, S - static, r - rip, b - bgp, o - ospf
# DST-ADDRESS PREF-SRC G GATEWAY DIS
0 ADC 10.10.10.0/24 10.10.10.2
1 Do 10.10.10.0/24
2 ADC 192.168.100.0/30 192.168.100.1
3 ADC 192.168.200.0/30 192.168.200.1
Generate routes for stress testing BGP functionality
Here is a script that we used to quickly generate 65000 routes for stress testing bgp peer sessions on 2.9.x.
# Removing old route table.
/ip route remove [/ip route find routing-mark=bgptest]

# Start new routing entries.
:local startip 10.100.1.0
:for i from=1 to=65535 do={

:log info ("adding route " . ($startip   $i�
/ip route add dst-address=�startip   $i) . "/32") gateway=10.20.0.1 routing-mark=bgptest

}
source: http://wiki.mikrotik.com/wiki/Generate_routes_for_stress_testing_BGP_functionality
Limit traffic from Rapidshare
You can use this little script to get an IP from Rapidshare...This script will look into the DNS cache, and everytime the word rapidshare comes out, it will place the IP it get to a address list, then after that you can config a queue rule to limit the traffic...
:foreach i in=[/ip dns cache find] do={
:if ([:find [/ip dns cache get $i name] "rapidshare"] > 0) do={
:log info ("rapidshare: " . [/ip dns cache get $i name] . " (ip address " . [/ip dns cache get $i address] . ")")
/ip firewall address-list add address=[/ip dns cache get $i address] list=rapidshare disabled=no
}
}
Source : http://forum.mikrotik.com/viewtopic.php?p=84349#p84349
Minggu, 10 Februari 2008
Layer2 VPN Server
Ethernet over IP (EoIP) Tunneling is a MikroTik RouterOS protocol that creates an Ethernet tunnel between two routers on top of an IP connection. A VLAN is a logical grouping that allows end users to communicate as if they were physically connected to a single isolated LAN, independent of the physical configuration of the network.
It's required that you have switch that support 802.1Q VLAN and shows how to setup Layer 2 VPN Server. Configuration of switches not added coz it depends on how network you have.
With this example we group devices on one or more LANs that are configured ,so that they can communicate as if they were attached to the same wire when in fact they are located on a number of different LAN segments. Using EoIP you can reach routers that are connected by wireless and with vlans we then segment network. Because VLANs are based on logical instead of physical connections, they are extremely flexible. So, in my network i added a few location that goes througt fiber optic and about 40 wireless locations.
Server Side:
First, install latest Mikrotik OS on computer with 2 ethernet intefaces.
   Now lets configure them.

  /interface  set 0 name=ether1-internet
    set 1 name=ether2-trunk

  /ip address  add address=195.101.10.5/29 interface=ether1-internet comment="" disabled=no


 Create Eoip interface for remote router1:

 /interface eoip
  add name=eoip-router1 tunnel-id=310 remote-address=196.200.50.5 comment="" disabled=no

 Create vlan for remote router1:

  /interface vlan
  add name=vlan-router1 interface=ether2-trunk vlan-id=310 comment="" disabled=no
  Now bridge eoip and vlan:

  /interface bridge
  add name=bridge-to-router1

 /interface bridge port
  add interface=eoip-router1 bridge=bridge-to-router1
  add interface=vlan-router1 bridge=bridge-to-router1
Now we add configuration for remote router2
  Create Eoip interface for remote router2:

 /interface eoip
  add name="eoip-router2" tunnel-id=312 remote-address=196.200.50.6 comment="" disabled=no

 Create vlan for remote router2:

  /interface vlan
  add name=vlan-router2 interface=ether2-trunk vlan-id=312 comment="" disabled=no
  Now bridge eoip and vlan:

  /interface bridge
  add name=bridge-to-router2

 /interface bridge port
  add interface=eoip-router2 bridge=bridge-to-router2 comment="" disabled=no
  add interface=vlan-router2 bridge=bridge-to-router2 comment="" disabled=no
Remote Router1 side:
  /interface eoip
  add name=eoip-client remote-address=195.101.10.5 tunnel-id=310 comment="" disabled=no

 /interface bridge
  add name=bridge-to-router1

 /interface bridge port
  add interface=eoip-client bridge=bridge-to-router1 comment="" disabled=no
  add interface=ether1 bridge=bridge-to-router1 comment="" disabled=no
Remote Router2 side:
   /interface eoip
  add name=eoip-client remote-address=195.101.10.5 tunnel-id=312 comment="" disabled=no

 /interface bridge
  add name=bridge-to-router2

 /interface bridge port
  add interface=eoip-client bridge=bridge-to-router2 comment="" disabled=no
  add interface=ether1 bridge=bridge-to-router2 comment="" disabled=no
Depends on the network you have , some modifications are required , and dont forget to add and configure conresponding VLANS on Allied Telesyn, Cisco , etc. switches.
TIP: You can always add some address to bridge, just to check if there is connectivity to remote router with ping command.
Server side: /ip address
add adress=192.168.100.1/30 interface=bridge-to-router1 comment="" disabled=no
Remote router side: /ip address
 add address=192.168.100.2/30 interface=bridge-to-router1 comment="" disabled=no

from: http://wiki.mikrotik.com/wiki/Layer2_VPN_Server
Jumat, 08 Februari 2008
IPSec VPN with Dynamic Routing / Mikrotik and Cisco
Mikrotik RouterOS
If you are using ROS v3.0 or above, be sure to check the end of this list to see a list of necessary mod.
First should configure a Tunnel Interface:
   / interface ipip
  add name="Tunnel1" mtu=1480 local-address=10.10.1.100 remote-address=10.10.1.200 comment="" disabled=no
After that all interfaces are configured, than should asign IP addresses for interfaces:
   / ip address
  add address=10.10.1.100/24 network=10.10.1.0 broadcast=10.10.1.255 interface=WAN comment="" disabled=no
  add address=192.168.1.1/24 network=192.168.1.0 broadcast=192.168.1.255 interface=LAN comment="" disabled=no
  add address=172.16.0.1/30 network=172.16.0.0 broadcast=192.168.0.3 interface=Tunnel1 comment="" disabled=no
Enable Routing in Mikrotik Router, in this case RIP:
  / routing rip
 set redistribute-static=no redistribute-connected=no redistribute-ospf=no redistribute-bgp=no metric-static=1 \
 metric-connected=1  metric-ospf=1 metric-bgp=1 update-timer=30s timeout-timer=3m garbage-timer=2m
 / routing rip interface
 add interface=Tunnel1 receive=v2 send=v2 authentication=none authentication-key="" prefix-list-in="" prefix-list-out=""
 / routing rip neighbor
 add address=172.16.0.2
 / routing rip network
 add address=192.168.1.0/24
 add address=172.16.0.0/30
IPSec setup, here should be defined the ipsec policy, peer and proposal. Make sure that policy should not have enabled option tunnel, in this case tunel should be set to NO, because it will be used the transport mode of IPSec not the tunnel mode:
  / ip ipsec proposal
 add name="IPSec" auth-algorithms=md5 enc-algorithms=3des lifetime=30m lifebytes=0 pfs-group=modp1024 disabled=no
 / ip ipsec peer
 add address=10.10.1.200 secret="ipsec" generate-policy=no exchange-mode=main send-initial-contact=yes \
 proposal-check=obey   hash-algorithm=md5 enc-algorithm=3des dh-group=modp1024 lifetime=1d lifebytes=0 disabled=no
 / ip ipsec policy
 add src-address=10.10.1.100/32:any dst-address=10.10.1.200/32:any protocol=all action=encrypt level=require \
 ipsec-protocols=esp  tunnel=no sa-src-address=10.10.1.100 sa-dst-address=10.10.1.200 \
 proposal=IPSec manual-sa=none dont-fragment=clear disabled=no
In V3.0 the bolded line will change on:
  / routing rip interface
 add interface=Tunnel1 receive=v2 send=v2 authentication=none authentication-key="" in-prefix-list="" out-prefix-list=""
 / ip ipsec proposal
 add name="IPSec" auth-algorithms=md5 enc-algorithms=3des lifetime=30m pfs-group=modp1024 disabled=no
 / ip ipsec peer
 add address=10.10.1.200/32:500 secret="ipsec" generate-policy=no exchange-mode=main send-initial-contact=yes \
 proposal-check=obey   hash-algorithm=md5 enc-algorithm=3des dh-group=modp1024 lifetime=1d lifebytes=0 disabled=no
Cisco IOS
Cisco Interfaces and addresses:
  FastEthernet 0/0
  description *** WAN ***
  ip address 10.10.1.200 255.255.255.0
  crypto map vpn
  FastEthernet 0/1
  description *** LAN ***
  ip address 192.168.2.1 255.255.255.0
Cisco Tunnel Interface:
  interface Tunnel1
 description **Cisco Peer**
 ip address 172.16.0.2 255.255.255.252
 no ip redirects
 no ip unreachables
 no ip proxy-arp
 ip mtu 1480
 ip rip v2-broadcast
 ip tcp adjust-mss 1400
 load-interval 30
 tunnel source 10.10.1.200
 tunnel destination 10.10.1.100
 tunnel mode ipip
 hold-queue 1024 in
 hold-queue 1024 out
Routing in Cisco:
  router rip
  version 2
  timers basic 30 60 90 90
  redistribute connected metric 1 route-map connected-to-rip
  redistribute static metric 5 route-map static-to-rip
  network 172.16.0.2
  network 192.168.2.0
  distribute-list prefix LAN out
  no auto-summary
Setup the prefix-list to match the Local subnet:
ip prefix-list LAN seq 10 permit 192.168.2.0/24
Setup route-maps to match interfaces to be advertised by RIP:
  route-map connected-to-rip permit 10
 match interface FastEthernet0/0
 !
 route-map static-to-rip permit 10
 match ip address prefix-list LAN
IPSec and Crypto setup in Cisco, also here trasnport mode of IPSec should be setup:
 !
 crypto isakmp policy 1
  encr 3des
  hash md5
  authentication pre-share
  group 2
 !
 crypto isakmp key ipsec address 0.0.0.0 0.0.0.0
 !
 crypto ipsec security-association idle-time 600
 !
 crypto ipsec transform-set vpn esp-3des esp-md5-hmac
  mode transport
 !
 crypto map vpn 1 ipsec-isakmp
  description **To Mikrotik Peer**
  set peer 10.10.1.100
  set transform-set vpn
  set pfs group2
  match address mikrotik_peer
 !
Setup access-list to match the IPSec peer:
  ip access-list extended mikrotik_peer
  permit ipinip host 10.10.1.200 host 10.10.1.100
Type this in "enable" mode to view your routing table (after succesfull RIP update):
sh ip route
or
sh ip rip database
This example can be implemented also with another routing protocol like OSPF, and also very simply we can setup here a failover connection. Regarding the failover, the setup is very easy, all that we need is to create another set of tunnels via another ISP or gateway, but again the remote peer is the same router. Instead of the routing protocol for the second set of tunnels, it needs static routes to be configured, only that the static routes should have higher distance than the dynamic protocol. The idea is that, when the primary link will go down (dynamic routing distance=120) than the backup link becomes active (static routes distance=200), as soon as the primary link will come up, it will put the failover link in inactive mode.Titolo del collegamento
from http://wiki.mikrotik.com/wiki/IPSec_VPN_with_Dynamic_Routing_/_Mikrotik_and_Cisco
Mesh wds
Configuration of the AP Mesh router
- Add the Bridge interface
/interface bridge add name=bridge1 protocol-mode=rstp
- Add Ethernet and Wireless interfaces to the bridge group
/interface bridge port add interface=ether1 bridge=bridge1
/interface bridge port add interface=wlan1 bridge=bridge1
- Configure the Wireless card as AP and to support WDS
/interface wireless set wlan1 mode=ap-bridge band=2.4ghz-b/g frequency=2437
ssid=mesh wds-mode=dynamic wds-default-bridge=bridge1  disabled=no
- Create WPA2-EAP security profile
/interface wireless security-profiles add name=WPA2 mode=dynamic-keys
authentication-types=wpa2-eap unicast-ciphers=aes-ccm  group-ciphers=aes-ccm eap-methods=eap-tls tls-mode=no-certificates
- Specify the connect list to apply WPA2 security profile for the WDS links
The communication between the APs using WDS will be encrypted using WPA2 security profile, but the clients will be able to connect to the APs without the encryption.
/interface wireless connect-list add interface=wlan1 security-profile=WPA2
Kamis, 07 Februari 2008
Limit Different Bandwidth In Day and Night
Limit Different Bandwidth In Day and Night.
There are lot many ways to limit bandwidth for day and Night, but personally I found this is the easiest way, Here it is.
I have used Simple Queue, Script and Scheduler.
Suppose we have one network 192.168.1.0/24 and want to limit Bandwidth for day and Night Time.
Network 192.168.1.0/24
Bandwidth = 06:00am – 18:00pm – 1Mbps.
Bandwidth = 18:00pm – 06:00am – 2Mbps.
Create two simple queues for the same network with different Bandwidth Limit.
/queue simple
#name=”Day” target-addresses=192.168.1.0/24 dst-address=0.0.0.0/0
interface=parent=none direction=both priority=8
queue=default-small/default-small limit-at=512k/512k
max-limit=1M/1M total-queue=default-small
#name=”Night” target-addresses=192.168.1.0/24 dst-address=0.0.0.0/0
interface=parent=none direction=both priority=8
queue=default-small/default-small limit-at=1M/1M
max-limit=2M/2M total-queue=default-small
Now, write scripts
/system script
#name=”Day” source=/queue simple enable Day; /queue simple disable Night

#name=”Night” source=/queue simple enable Night; /queue simple disable Day
Finally, Schedule it
/system scheduler
#name=”Day” on-event=Day start-date=oct/13/2007 start-time=06:00:00 interval=1d

#name=”Night” on-event=Night start-date=oct/13/2007 start-time=18:00:00 interval=1d

from: http://wiki.mikrotik.com/wiki/Limit_Different_Bandwidth_In_Day_and_Night
Generate bogons firewall chain based on routing-marks
Code:
## Builds an address list with bogons based on the
## learned bgp routes which have the specific routing-mark.

:log info "Removing all BOGONS, starting sync."
:foreach subnet in [/ip firewall address-list find list=bogons] do {
 /ip firewall address-list remove $subnet
}

:foreach subnet in [/ip route find routing-mark=bogons] do {
 :set bogon [/ip route get $subnet dst-address]
 :log info ("Found " . $bogon . " as bogon entry.")
 /ip firewall address-list add list=bogons address=$bogon
}
Now you can use this type of chain to catch traffic coming from bogon ip addresses. Reference / jump to this chain from wherever you have traffic coming from untrusted networks. You'll notice that the first few entries are bypasses for specific bogons that are allowed.
add chain=BOGONS src-address=10.8.24.1 protocol=icmp action=return \ comment="Bypass for cable modem internal IP \(Traceroutes requires \ this\)" disabled=no add chain=BOGONS src-address=192.168.100.0/24 action=return \ comment="CABLE INTERNAL IP - Bypass also" disabled=no add chain=BOGONS limit=2,5 src-address-list=bogons action=log \ log-prefix="BOGONS" comment="Reference the BOGONS address-list and \ LOG any that are on that list." disabled=no add chain=BOGONS src-address-list=bogons action=drop \ comment="Reference the BOGONS address-list and DROP any that are \ on that list." disabled=no add chain=BOGONS action=return comment="If not, return them to the \ previous chain." disabled=noHere is the current (12/05) chain if you just want to copy and paste it into your ruleset.
/ ip firewall address-list add list=bogons address=1.0.0.0/8 comment="" disabled=no add list=bogons address=2.0.0.0/8 comment="" disabled=no add list=bogons address=5.0.0.0/8 comment="" disabled=no add list=bogons address=7.0.0.0/8 comment="" disabled=no add list=bogons address=10.0.0.0/8 comment="" disabled=no add list=bogons address=23.0.0.0/8 comment="" disabled=no add list=bogons address=27.0.0.0/8 comment="" disabled=no add list=bogons address=31.0.0.0/8 comment="" disabled=no add list=bogons address=36.0.0.0/8 comment="" disabled=no add list=bogons address=37.0.0.0/8 comment="" disabled=no add list=bogons address=39.0.0.0/8 comment="" disabled=no add list=bogons address=42.0.0.0/8 comment="" disabled=no add list=bogons address=49.0.0.0/8 comment="" disabled=no add list=bogons address=50.0.0.0/8 comment="" disabled=no add list=bogons address=77.0.0.0/8 comment="" disabled=no add list=bogons address=78.0.0.0/8 comment="" disabled=no add list=bogons address=79.0.0.0/8 comment="" disabled=no add list=bogons address=92.0.0.0/8 comment="" disabled=no add list=bogons address=93.0.0.0/8 comment="" disabled=no add list=bogons address=94.0.0.0/8 comment="" disabled=no add list=bogons address=95.0.0.0/8 comment="" disabled=no add list=bogons address=96.0.0.0/8 comment="" disabled=no add list=bogons address=97.0.0.0/8 comment="" disabled=no add list=bogons address=98.0.0.0/8 comment="" disabled=no add list=bogons address=99.0.0.0/8 comment="" disabled=no add list=bogons address=100.0.0.0/8 comment="" disabled=no add list=bogons address=101.0.0.0/8 comment="" disabled=no add list=bogons address=102.0.0.0/8 comment="" disabled=no add list=bogons address=103.0.0.0/8 comment="" disabled=no add list=bogons address=104.0.0.0/8 comment="" disabled=no add list=bogons address=105.0.0.0/8 comment="" disabled=no add list=bogons address=106.0.0.0/8 comment="" disabled=no add list=bogons address=107.0.0.0/8 comment="" disabled=no add list=bogons address=108.0.0.0/8 comment="" disabled=no add list=bogons address=109.0.0.0/8 comment="" disabled=no add list=bogons address=110.0.0.0/8 comment="" disabled=no add list=bogons address=111.0.0.0/8 comment="" disabled=no add list=bogons address=112.0.0.0/8 comment="" disabled=no add list=bogons address=113.0.0.0/8 comment="" disabled=no add list=bogons address=114.0.0.0/8 comment="" disabled=no add list=bogons address=115.0.0.0/8 comment="" disabled=no add list=bogons address=116.0.0.0/8 comment="" disabled=no add list=bogons address=117.0.0.0/8 comment="" disabled=no add list=bogons address=118.0.0.0/8 comment="" disabled=no add list=bogons address=119.0.0.0/8 comment="" disabled=no add list=bogons address=120.0.0.0/8 comment="" disabled=no add list=bogons address=121.0.0.0/8 comment="" disabled=no add list=bogons address=122.0.0.0/8 comment="" disabled=no add list=bogons address=123.0.0.0/8 comment="" disabled=no add list=bogons address=169.254.0.0/16 comment="" disabled=no add list=bogons address=172.16.0.0/12 comment="" disabled=no add list=bogons address=173.0.0.0/8 comment="" disabled=no add list=bogons address=174.0.0.0/8 comment="" disabled=no add list=bogons address=175.0.0.0/8 comment="" disabled=no add list=bogons address=176.0.0.0/8 comment="" disabled=no add list=bogons address=177.0.0.0/8 comment="" disabled=no add list=bogons address=178.0.0.0/8 comment="" disabled=no add list=bogons address=179.0.0.0/8 comment="" disabled=no add list=bogons address=180.0.0.0/8 comment="" disabled=no add list=bogons address=181.0.0.0/8 comment="" disabled=no add list=bogons address=182.0.0.0/8 comment="" disabled=no add list=bogons address=183.0.0.0/8 comment="" disabled=no add list=bogons address=184.0.0.0/8 comment="" disabled=no add list=bogons address=185.0.0.0/8 comment="" disabled=no add list=bogons address=186.0.0.0/8 comment="" disabled=no add list=bogons address=187.0.0.0/8 comment="" disabled=no add list=bogons address=192.0.2.0/24 comment="" disabled=no add list=bogons address=192.168.0.0/16 comment="" disabled=no add list=bogons address=197.0.0.0/8 comment="" disabled=no add list=bogons address=198.18.0.0/15 comment="" disabled=no add list=bogons address=223.0.0.0/8 comment="" disabled=no
original script http://wiki.mikrotik.com/wiki/Generate_bogons_firewall_chain_based_on_routing-marks
Script Send Backup email
/ tool e-mail
set server=1.2.3.4 from="SomeSystemName@somewhere.tld"
"Generate a Backup" Script
Example 1
/ system script add name="backup_mail" source="/system backup save name=email_backup \n/tool \ e-mail send file=email_backup.backup to=\"someone@somewhere.tld\" body=\"See \ attached file for System Backup\" subject=\(\[/system identity get name\] \ . \" \" . \[/system clock get time\] . \" \" . \[/system clock get date\] \ . \" Backup\"\)\n"Example 2
:log info "backup beginning now"
:global backupfile ([/system identity get name] . "-" . [/system clock get time])
/system backup save name=$backupfile
:log info "backup pausing for 10s"
:delay 10s
:log info "backup being emailed"
/tool e-mail send to="USERNAME@gmail.com" subject=([/system identity get name] . \
" Backup") from=ROUTER@MAIDOMAIN.com file=$backupfile server=1.3.3.7
:log info "backup finished"
"Weekly Scheduler" Script
Example 1
/ system scheduler add name="sched_backup_mail" on-event="backup_mail" start-date=jan/01/1970 start-time=07:30:00 interval=7d \ comment="" disabled=noExample 2
/system script add name=ebackup source={/system backup save name=([/system identity get name] . "-" . \ [:pick [/system clock get date] 7 11] . [:pick [/system clock get date] 0 3] . [:pick [/system clock get date] 4 6]); \ /tool e-mail send to="youremail@yourdomain.com" subject=([/system identity get name] . " Backup " . \ [/system clock get date]) file=([/system identity get name] . "-" . [:pick [/system clock get date] 7 11] . \ [:pick [/system clock get date] 0 3] . [:pick [/system clock get date] 4 6] . ".backup"); :delay 10; \ /file rem [/file find name=([/system identity get name] . "-" . [:pick [/system clock get date] 7 11] . \ [:pick [/system clock get date] 0 3] . [:pick [/system clock get date] 4 6] . ".backup")]; \ :log info ("System Backup emailed at " . [/sys cl get time] . " " . [/sys cl get date])}Rabu, 06 Februari 2008
Siren alarm script
:for c from=1 to=50 step=1 \
do={ \
:set i 15
:set x 1900
:do {\
:beep length=400ms frequency=$x; :delay 25ms
:set i ($i - 1);
:set x ($x +35)
} \
while (($i <16)>0))
:beep length=0 frequency=0
}
Selasa, 05 Februari 2008
Standart Firewall (Standart firewall setting)
/ip firewall filter add chain=forward connection-state=invalid action=drop comment="Drop invalid connections" disabled=no
/ip firewall filter add chain=forward connection-state=established action=accept comment="Established Connections" disabled=no
/ip firewall filter add chain=forward connection-state=related action=accept comment="Related connections" disabled=no
/ip firewall filter add chain=forward action=jump jump-target=virus comment="!!! Check for well-known viruses !!!" disabled=no
/ip firewall filter add chain=forward protocol=udp action=accept comment="UDP" disabled=no
/ip firewall filter add chain=forward protocol=icmp limit=50/5,2 action=accept comment="Allow limited Pings" disabled=no
/ip firewall filter add chain=forward protocol=icmp action=drop comment="Drop excess pings" disabled=no
/ip firewall filter add chain=input connection-state=invalid action=drop comment="Drop invalid connections" disabled=no
/ip firewall filter add chain=input tcp-flags=!syn connection-state=established action=accept comment="Accept established connections" disabled=no
/ip firewall filter add chain=input connection-state=related action=accept comment="Accept related connections" disabled=no
/ip firewall filter add chain=input action=jump jump-target=virus comment="!!! Check for well-known viruses !!!" disabled=no
/ip firewall filter add chain=input protocol=udp action=accept comment="UDP" disabled=no
/ip firewall filter add chain=input protocol=icmp limit=50/5,2 action=accept comment="Allow limited pings" disabled=no
/ip firewall filter add chain=input protocol=icmp action=drop comment="Drop excess pings" disabled=no
/ip firewall filter add chain=input dst-port=22 protocol=tcp action=accept comment="SSH for demo purposes" disabled=no
/ip firewall filter add chain=input dst-port=23 protocol=tcp action=accept comment="Telnet for demo purposes" disabled=no
/ip firewall filter add chain=input dst-port=80 protocol=tcp action=accept comment="http for demo purposes" disabled=no
/ip firewall filter add chain=input dst-port=3987 protocol=tcp action=accept comment="winbox for demo purposes" disabled=no
/ip firewall filter add chain=input action=accept log=yes comment="Log and drop everything else" disabled=no
/ip firewall filter add chain=virus dst-port=135-139 protocol=tcp action=drop comment="Drop Blaster Worm" disabled=no
/ip firewall filter add chain=virus dst-port=135-139 protocol=udp action=drop comment="Drop Messenger Worm" disabled=no
/ip firewall filter add chain=virus dst-port=445 protocol=tcp action=drop comment="Drop Blaster Worm" disabled=no
/ip firewall filter add chain=virus dst-port=445 protocol=udp action=drop comment="Drop Blaster Worm" disabled=no
/ip firewall filter add chain=virus dst-port=593 protocol=tcp action=drop comment="________" disabled=no
/ip firewall filter add chain=virus dst-port=1024-1030 protocol=tcp action=drop comment="________" disabled=no
/ip firewall filter add chain=virus dst-port=1080 protocol=tcp action=drop comment="Drop MyDoom" disabled=no
/ip firewall filter add chain=virus dst-port=1214 protocol=tcp action=drop comment="________" disabled=no
/ip firewall filter add chain=virus dst-port=1363 protocol=tcp action=drop comment="ndm requester" disabled=no
/ip firewall filter add chain=virus dst-port=1364 protocol=tcp action=drop comment="ndm server" disabled=no
/ip firewall filter add chain=virus dst-port=1368 protocol=tcp action=drop comment="screen cast" disabled=no
/ip firewall filter add chain=virus dst-port=1373 protocol=tcp action=drop comment="hromgrafx" disabled=no
/ip firewall filter add chain=virus dst-port=1377 protocol=tcp action=drop comment="cichlid" disabled=no
/ip firewall filter add chain=virus dst-port=1433-1434 protocol=tcp action=drop comment="Worm" disabled=no
/ip firewall filter add chain=virus dst-port=2745 protocol=tcp action=drop comment="Bagle Virus" disabled=no
/ip firewall filter add chain=virus dst-port=2283 protocol=tcp action=drop comment="Drop Dumaru.Y" disabled=no
/ip firewall filter add chain=virus dst-port=2535 protocol=tcp action=drop comment="Drop Beagle" disabled=no
/ip firewall filter add chain=virus dst-port=2745 protocol=tcp action=drop comment="Drop Beagle.C-K" disabled=no
/ip firewall filter add chain=virus dst-port=3127-3128 protocol=tcp action=drop comment="Drop MyDoom" disabled=no
/ip firewall filter add chain=virus dst-port=3410 protocol=tcp action=drop comment="Drop Backdoor OptixPro" disabled=no
/ip firewall filter add chain=virus dst-port=4444 protocol=tcp action=drop comment="Worm" disabled=no
/ip firewall filter add chain=virus dst-port=4444 protocol=udp action=drop comment="Worm" disabled=no
/ip firewall filter add chain=virus dst-port=5554 protocol=tcp action=drop comment="Drop Sasser" disabled=no
/ip firewall filter add chain=virus dst-port=8866 protocol=tcp action=drop comment="Drop Beagle.B" disabled=no
/ip firewall filter add chain=virus dst-port=9898 protocol=tcp action=drop comment="Drop Dabber.A-B" disabled=no
/ip firewall filter add chain=virus dst-port=10000 protocol=tcp action=drop comment="Drop Dumaru.Y" disabled=no
/ip firewall filter add chain=virus dst-port=10080 protocol=tcp action=drop comment="Drop MyDoom.B" disabled=no
/ip firewall filter add chain=virus dst-port=12345 protocol=tcp action=drop comment="Drop NetBus" disabled=no
/ip firewall filter add chain=virus dst-port=17300 protocol=tcp action=drop comment="Drop Kuang2" disabled=no
/ip firewall filter add chain=virus dst-port=27374 protocol=tcp action=drop comment="Drop SubSeven" disabled=no
/ip firewall filter add chain=virus dst-port=65506 protocol=tcp action=drop comment="Drop PhatBot, Agobot, Gaobot" disabled=no
Dmitry on firewalling
Protocol classifier
/ ip firewall mangleSanity-check
add chain=prerouting protocol=tcp connection-state=new action=jump jump-target=tcp-services
add chain=prerouting protocol=udp connection-state=new action=jump jump-target=udp-services
add chain=prerouting connection-state=new action=jump jump-target=other-services
add chain=tcp-services protocol=tcp src-port=1024-65535 dst-port=20-21 action=mark-connection new-connection-mark=ftp passthrough=no
add chain=tcp-services protocol=tcp src-port=513-65535 dst-port=22 action=mark-connection new-connection-mark=ssh passthrough=no
add chain=tcp-services protocol=tcp src-port=1024-65535 dst-port=23 action=mark-connection new-connection-mark=telnet passthrough=no
add chain=tcp-services protocol=tcp src-port=1024-65535 dst-port=25 action=mark-connection new-connection-mark=smtp passthrough=no
add chain=tcp-services protocol=tcp src-port=53 dst-port=53 action=mark-connection new-connection-mark=dns passthrough=no
add chain=tcp-services protocol=tcp src-port=1024-65535 dst-port=53 action=mark-connection new-connection-mark=dns passthrough=no
add chain=tcp-services protocol=tcp src-port=1024-65535 dst-port=80 action=mark-connection new-connection-mark=http passthrough=no
add chain=tcp-services protocol=tcp src-port=1024-65535 dst-port=110 action=mark-connection new-connection-mark=pop3 passthrough=no
add chain=tcp-services protocol=tcp src-port=1024-65535 dst-port=113 action=mark-connection new-connection-mark=auth passthrough=no
add chain=tcp-services protocol=tcp src-port=1024-65535 dst-port=119 action=mark-connection new-connection-mark=nntp passthrough=no
add chain=tcp-services protocol=tcp src-port=1024-65535 dst-port=143 action=mark-connection new-connection-mark=imap passthrough=no
add chain=tcp-services protocol=tcp src-port=1024-65535 dst-port=161-162 action=mark-connection new-connection-mark=snmp passthrough=no
add chain=tcp-services protocol=tcp src-port=1024-65535 dst-port=443 action=mark-connection new-connection-mark=https passthrough=no
add chain=tcp-services protocol=tcp src-port=1024-65535 dst-port=465 action=mark-connection new-connection-mark=smtps passthrough=no
add chain=tcp-services protocol=tcp src-port=1024-65535 dst-port=993 action=mark-connection new-connection-mark=imaps passthrough=no
add chain=tcp-services protocol=tcp src-port=1024-65535 dst-port=995 action=mark-connection new-connection-mark=pop3s passthrough=no
add chain=tcp-services protocol=tcp src-port=1024-65535 dst-port=1723 action=mark-connection new-connection-mark=pptp passthrough=no
add chain=tcp-services protocol=tcp src-port=1024-65535 dst-port=2379 action=mark-connection new-connection-mark=kgs passthrough=no
add chain=tcp-services protocol=tcp src-port=1024-65535 dst-port=3128 action=mark-connection new-connection-mark=proxy passthrough=no
add chain=tcp-services protocol=tcp src-port=1024-65535 dst-port=3389 action=mark-connection new-connection-mark=win-ts passthrough=no
add chain=tcp-services protocol=tcp src-port=1024-65535 dst-port=4242-4243 action=mark-connection new-connection-mark=emule passthrough=no
add chain=tcp-services protocol=tcp src-port=4661-4662 dst-port=1024-65535 action=mark-connection new-connection-mark=overnet passthrough=no
add chain=tcp-services protocol=tcp src-port=4711 dst-port=1024-65535 action=mark-connection new-connection-mark=emule passthrough=no
add chain=tcp-services protocol=tcp src-port=1024-65535 dst-port=5900-5901 action=mark-connection new-connection-mark=vnc passthrough=no
add chain=tcp-services protocol=tcp src-port=1024-65535 dst-port=6667-6669 action=mark-connection new-connection-mark=irc passthrough=no
add chain=tcp-services protocol=tcp src-port=1024-65535 dst-port=6881-6889 action=mark-connection new-connection-mark=bittorrent passthrough=no
add chain=tcp-services protocol=tcp src-port=1024-65535 dst-port=8080 action=mark-connection new-connection-mark=http passthrough=no
add chain=tcp-services protocol=tcp src-port=1024-65535 dst-port=8291 action=mark-connection new-connection-mark=winbox passthrough=no
add chain=tcp-services protocol=tcp action=mark-connection new-connection-mark=other-tcp passthrough=no
add chain=udp-services protocol=udp src-port=1024-65535 dst-port=53 action=mark-connection new-connection-mark=dns passthrough=no
add chain=udp-services protocol=udp src-port=1024-65535 dst-port=123 action=mark-connection new-connection-mark=ntp passthrough=no
add chain=udp-services protocol=udp src-port=1024-65535 dst-port=1701 action=mark-connection new-connection-mark=l2tp passthrough=no
add chain=udp-services protocol=udp src-port=1024-65535 dst-port=4665 action=mark-connection new-connection-mark=emule passthrough=no
add chain=udp-services protocol=udp src-port=1024-65535 dst-port=4672 action=mark-connection new-connection-mark=emule passthrough=no
add chain=udp-services protocol=udp src-port=4672 dst-port=1024-65535 action=mark-connection new-connection-mark=emule passthrough=no
add chain=udp-services protocol=udp src-port=1024-65535 dst-port=12053 action=mark-connection new-connection-mark=overnet passthrough=no
add chain=udp-services protocol=udp src-port=12053 dst-port=1024-65535 action=mark-connection new-connection-mark=overnet passthrough=no
add chain=udp-services protocol=udp src-port=36725 dst-port=1024-65535 action=mark-connection new-connection-mark=skype passthrough=no
add chain=udp-services protocol=udp connection-state=new action=mark-connection new-connection-mark=other-udp passthrough=no
add chain=other-services protocol=icmp icmp-options=8:0-255 action=mark-connection new-connection-mark=ping passthrough=no
add chain=other-services protocol=gre action=mark-connection new-connection-mark=gre passthrough=no
add chain=other-services action=mark-connection new-connection-mark=other passthrough=no
/ip firewall mangle/ ip firewall address-list
add chain=prerouting in-interface=Public dst-address-list=nat-addr action=mark-packet new-packet-mark=nat-traversal passthrough=no
add list=illegal-addr address=0.0.0.0/8 comment="illegal addresses"
add list=illegal-addr address=127.0.0.0/8
add list=illegal-addr address=224.0.0.0/3
add list=illegal-addr address=10.0.0.0/8
add list=illegal-addr address=172.16.0.0/12
add list=illegal-addr address=192.168.0.0/16
add list=local-addr address=172.31.255.0/29 comment="my local network "
add list=nat-addr address=172.31.255.0/29 comment="my local network"

/ ip firewall filter
add chain=forward in-interface=Local out-interface=Local action=accept comment="Allow traffic between wired and wireless networks"

/ ip firewall filter
add chain=forward action=jump jump-target=sanity-check comment="Sanity Check"
add chain=sanity-check packet-mark=nat-traversal action=jump jump-target=drop comment="Deny illegal NAT traversal"
add chain=sanity-check protocol=tcp psd=20,3s,3,1 action=add-src-to-address-list address-list=blocked-addr address-list-timeout=1d comment="Block port scans"
add chain=sanity-check protocol=tcp tcp-flags=fin,psh,urg,!syn,!rst,!ack action=add-src-to-address-list address-list=blocked-addr address-list-timeout=1d comment="Block TCP Null scan"
add chain=sanity-check protocol=tcp tcp-flags=!fin,!syn,!rst,!psh,!ack,!urg action=add-src-to-address-list address-list=blocked-addr address-list-timeout=1d comment="Block TCP Xmas scan"
add chain=sanity-check protocol=tcp src-address-list=blocked-addr action=jump jump-target=drop
add chain=sanity-check protocol=tcp tcp-flags=rst action=jump jump-target=drop comment="Drop TCP RST"
add chain=sanity-check protocol=tcp tcp-flags=fin,syn action=jump jump-target=drop comment="Drop TCP SYN+FIN"
add chain=sanity-check connection-state=invalid action=jump jump-target=drop comment="Dropping invalid connections at once"
add chain=sanity-check connection-state=established action=accept comment="Accepting already established connections"
add chain=sanity-check connection-state=related action=accept comment="Also accepting related connections"
add chain=sanity-check dst-address-type=broadcast,multicast action=jump jump-target=drop comment="Drop all traffic that goes to multicast or broadcast addresses"
add chain=sanity-check in-interface=Local dst-address-list=illegal-addr dst-address-type=!local action=jump jump-target=drop comment="Drop illegal destination addresses"
add chain=sanity-check in-interface=Local src-address-list=!local-addr action=jump jump-target=drop comment="Drop everything that goes from local interface but not from local address"
add chain=sanity-check in-interface=Public src-address-list=illegal-addr action=jump jump-target=drop comment="Drop illegal source addresses"
add chain=sanity-check in-interface=Public dst-address-list=!local-addr action=jump jump-target=drop comment="Drop everything that goes from public interface but not to local address"
add chain=sanity-check src-address-type=broadcast,multicast action=jump jump-target=drop comment="Drop all traffic that goes from multicast or broadcast addresses"

/ ip firewall filter
add chain=forward protocol=tcp action=jump jump-target=restrict-tcp
add chain=forward protocol=udp action=jump jump-target=restrict-udp
add chain=forward action=jump jump-target=restrict-ip
add chain=restrict-tcp connection-mark=auth action=reject
add chain=restrict-tcp connection-mark=smtp action=jump jump-target=smtp-first-drop comment="anti-spam policy"
add chain=smtp-first-drop src-address-list=first-smtp action=add-src-to-address-list address-list=approved-smtp
add chain=smtp-first-drop src-address-list=approved-smtp action=return
add chain=smtp-first-drop action=add-src-to-address-list address-list=first-smtp
add chain=smtp-first-drop action=reject reject-with=icmp-network-unreachable

/ ip firewall filter
add chain=restrict-tcp connection-mark=other-tcp action=jump jump-target=drop
add chain=restrict-udp connection-mark=other-udp action=jump jump-target=drop
add chain=restrict-ip connection-mark=other action=jump jump-target=drop

/ ip firewall filter
add chain=input src-address-type=local dst-address-type=local action=accept comment="Allow local traffic \(between router applications\)"
add chain=input in-interface=Local protocol=udp src-port=68 dst-port=67 action=jump jump-target=dhcp comment="DHCP protocol would not pass sanity checking, so enabling it explicitly before other checks"
add chain=input action=jump jump-target=sanity-check comment="Sanity Check"
add chain=input dst-address-type=!local action=jump jump-target=drop comment="Dropping packets not destined to the router itself, including all broadcast traffic"
add chain=input connection-mark=ping limit=5,5 action=accept comment="Allow pings, but at a very limited rate \(5 per sec\)"
add chain=input in-interface=Local action=jump jump-target=local-services comment="Allowing some services to be accessible from the local network"
add chain=input in-interface=Public action=jump jump-target=public-services comment="Allowing some services to be accessible from the Internet"
add chain=input action=jump jump-target=drop
add chain=dhcp src-address=0.0.0.0 dst-address=255.255.255.255 action=accept
add chain=dhcp src-address=0.0.0.0 dst-address-type=local action=accept
add chain=dhcp src-address-list=local-addr dst-address-type=local action=accept
add chain=local-services connection-mark=ssh action=accept comment="SSH \(22/TCP\)"
add chain=local-services connection-mark=dns action=accept comment="DNS"
add chain=local-services connection-mark=proxy action=accept comment="HTTP Proxy \(3128/TCP\)"
add chain=local-services connection-mark=winbox comment="Winbox \(8291/TCP\)" disabled=no
add chain=local-services action=drop comment="Drop Other Local Services"
add chain=public-services connection-mark=ssh action=accept comment="SSH \(22/TCP\)"
add chain=public-services connection-mark=pptp action=accept comment="PPTP \(1723/TCP\)"
add chain=public-services connection-mark=gre action=accept comment="GRE for PPTP"
add chain=public-services action=drop comment="Drop Other Public Services"
Proxying everything
/ ip firewall natadd chain=dstnat in-interface=Local connection-mark=dns action=redirect comment="proxy for DNS requests"
add chain=dstnat in-interface=Local connection-mark=http protocol=tcp action=redirect to-ports=3128 comment="proxy for HTTP requests"
add chain=dstnat in-interface=Local connection-mark=ntp action=redirect comment="proxy for NTP requests"
Enable Proxy servers
/ system ntp server
set enabled=yes broadcast=no multicast=no manycast=no
/ system ntp client
set enabled=yes mode=unicast primary-ntp=xxx.xxx.xxx.xxx secondary-ntp=0.0.0.0
/ ip proxy
set enabled=yes port=3128 parent-proxy=0.0.0.0:1 maximal-client-connections=1000 maximal-server-connections=1000
/ ip dns
set primary-dns=yyy.yyy.yyy.yyy secondary-dns=0.0.0.0 allow-remote-requests=yes cache-size=2048KiB cache-max-ttl=1w